

Proving That A User Sent An Email Message Is Known As
Encrypting with S/MIME
Before you start this procedure, you must first have added a certificate to the keychain on your computer. Once you have your signing certificate set up on your computer, you'll need to configure it in Outlook.
-
Under the File menu, select Options > Trust Center > Trust Center Settings.
-
In the left pane, select Email Security.
-
Under Encrypted email, choose Settings.
-
Under Certificates and Algorithms, click Chooseand select the S/MIME certificate.
-
Choose OK
-
If you are an Office Insider with Microsoft 365 subscription, here's what is new to you:
In an email message, choose Options, select Encrypt and pick Encrypt with S/MIME option from the drop down,
You'll see an Encrypt with S/MIME if you have an S/MIME certificate installed on your computer.
For Outlook 2019 and Outlook 2016,
In an email message, choose Options, select Permissions.
-
Finish composing your email and then choose Send.
Encrypt with Microsoft 365 Message Encryption
-
If you are a Microsoft 365 subscriber, here is what is new to you:
In an email message, choose Options, select Encrypt and pick the encryption that has the restrictions you want to enforce, such as Encrypt-Only or Do Not Forward.
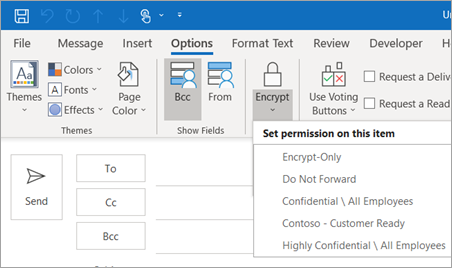
Note: Microsoft 365 Message Encryption is part of the Office 365 Enterprise E3 license. Additionally, the Encrypt-Only feature (the option under the Encrypt button) is only enabled for subscribers (Microsoft 365 Apps for enterprise users) that also use Exchange Online.
-
For Outlook 2019 and 2016,
In an email message, select Options > Permissions and pick the encryption option that has the restrictions you'd like to enforce, such as Do Not Forward.
Encrypt a single message
-
In message that you are composing, click File > Properties.
-
Click Security Settings, and then select the Encrypt message contents and attachments check box.
-
Compose your message, and then click Send.
Encrypt all outgoing messages
When you choose to encrypt all outgoing messages by default, you can write and send messages the same as with any other messages, but all potential recipients must have your digital ID to decode or view your messages.
-
On the File tab. choose Options >Trust Center > Trust Center Settings.
-
On the Email Security tab, under Encrypted email, select the Encrypt contents and attachments for outgoing messages check box.
-
To change additional settings, such as choosing a specific certificate to use, click Settings.
Important: Office 2010 is no longer supported. Upgrade to Microsoft 365 to work anywhere from any device and continue to receive support.
Upgrade now
Encrypt a single message
-
In the message that you're composing, on the Options tab, in the More Options group, click the dialog box launcher
 in the lower-right corner.
 -
Click Security Settings, and then select the Encrypt message contents and attachments check box.
-
Compose your message, and then click Send.
Encrypt all outgoing messages
When you choose to encrypt all outgoing messages by default, you can write and send messages the same as you do with any other messages. All potential recipients, however, must have your digital ID to decode or view those messages.
-
On the File tab, click Options > Trust Center > Trust Center Settings.
-
On the E-mail Security tab, under Encrypted e-mail, select the Encrypt contents and attachments for outgoing messages check box.
-
To change additional settings, such as choosing a specific certificate to use, click Settings.
Proving That A User Sent An Email Message Is Known As
Source: https://support.microsoft.com/en-us/office/encrypt-email-messages-373339cb-bf1a-4509-b296-802a39d801dc
Posted by: ishmaelbobre1943.blogspot.com
0 Response to "Proving That A User Sent An Email Message Is Known As"
Post a Comment